To create some gorgeous nail art design effects, try glitter and jewels, duo-tones, blended colors, marbling, polka dots or stamping. Here are 3 mesmerizing nail art designs every women will fall in love with and the best nail polish colors.
Prepare Your Nails

Before you even start creating your favorite nail polish design, you need to prepare your nails. Nail preparation for nail polish involves several activities including removal of old nail polish. Ensure that you are beginning with a clean slate by getting rid of any old polish from your nails. You also need to file and trim your nails before applying your new nail polish design. Shaping your nails will make them neat. Because you are looking to create your best nail art, ensure that you don’t trim your nails too short.
Apply A Basecoat

Usually, basecoats are bluish in color or clear. You can purchase a basecoat the same place you buy your nail polish. One thing about basecoats is that they ensure that your nails don’t get damaged or stained by your nail polish or any other material you are using in your nail art procedure. Consider applying a single basecoat layer and allow time for it to dry completely before proceeding. Note that some basecoats might remain tacky after they’ve dried. This texture helps the next layer, and the polish to stay intact for longer without chipping. Feel free to choose your desired basecoat.
1. Polka Dot Nail Art Designs

This nail polish design looks great, and you can do it at home. The idea is to create simple but captivating dots. To get started, choose two colors including a dot color and a base coat. For the dots, you may use more than two colors. Begin by applying the basecoat color and allowing sufficient time for it to completely dry. Proceed to dipping a pin, toothpick, or a small brush into the polish of your choice for the dots. Tap the implement lightly on your nail and continue doing this to achieve your desired number of dots on your nail. For additional effects, you may choose to create simple dots with varied sizes using thicker-tipped or thinner implements.
Make trailing or fading dots by dipping the implement inside your paint only once and apply your desired number of dots without reapplying the paint. Additionally, you can use a fine-tipped implement to perfectly dry your paint out to create swirls, and rays among other designs. Once your dots are fully dry, finish your nail art design with a top coat.
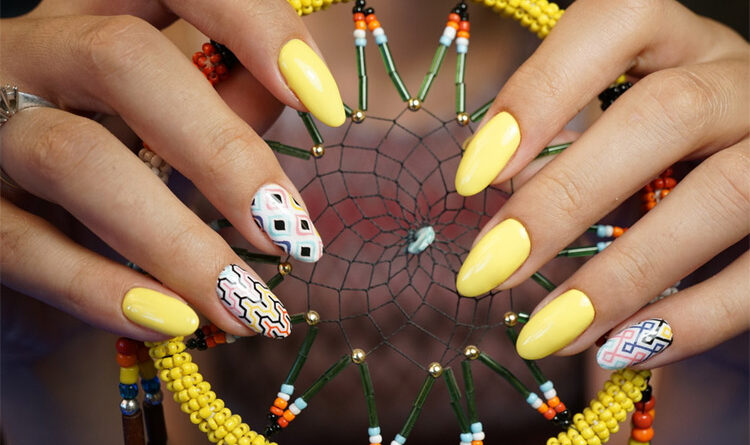
2. Water-Marbled Nail Art Designs

Water-marbled designs are creative nail art techniques that rely on various colors and water for unique looks. For this nail art design, consider getting the following materials:
- Basecoat
- 2-3 colors with the best blend such as yellow, white, and light blue
- Petroleum jelly
- Wide-mouthed cup full of room temperature water
Begin by applying your basecoat and allowing it to completely dry. Proceed to adding color to your water drop by drop. From a low height, drop nail polish inside the water then drop a different color into the first color’s center. Continue adding alternating colors drop wise to form a bulls-eye shape and alter the design using a toothpick. Insert the toothpick inside the water and create patterns by dragging it through the already formed bulls-eye shape. Some common designs include spiderweb designs, geometric shapes, and flower designs. Avoid going too far with your toothpick since over-blending may make the colors stop being distinct from each other. In case you’ve created something with your toothpick and you want to do away with it or you just don’t like it, consider discarding your first attempt and begin again.
Once you’ve arrived at the design of your liking, it’s time to apply it on your nails. Consider spreading some petroleum jelly around the skin surrounding your nails. Place your nails carefully against your design and slightly submerge them. To get rid of water from your nails, blow off water droplets using a cotton ball or a cotton swab. Your cotton ball should be coated with acetone if need be to properly clean the edges up and remove nail polish from fingers.
Related: 7 WAYS ON HOW TO MAKE YOUR NAILS GROW STRONGER AND STAY LONGER
3. Blended Color Nail Art Designs

This nail design 2017 requires three nail polish colors such as a basecoat and two different nail polish colors that appear great when swirled together on the basecoat’s top. Once you’ve applied your basecoat color and allowed it to dry, consider applying a clear topcoat and leave it for some time to dry. Use a toothpick to apply the first dot swirl color. On the second dot swirl color, use another toothpick rather than the one you used the first time. The second dot swirl color should be applied on the first dot’s top. Make sure that the first dot is wet when applying the second dot.
Use a striper brush or a clean toothpick to drag the colors together outwards and create swirls. Additionally, a marble effect can be created by placing several dots randomly on the nail’s first swirl color then placing a few more dots of the other swirl color on top and around the first dots set. Swirl the dots together and around by moving the implement you are using in an S-shaped or criss-cross, or figure 8 pattern. You may as well design a watercolor effect using two or more nail polish colors preferably white and other two colors of your choice.
Conclusion
Everybody wants to look beautiful and we are always searching for ways to add even more flair to our look. One way to add the much desired flair to our looks is nail art. The right nail art design will perfectly complement your outfit and prepare you for your special event. Nail designs 2017 will add unique touches to your every day personality. Although over-detailed nail arts should be left to the experts, there are dozens of nail polish design you can create on your own.
“Hope you find the post helpful and we excited to hear what you think of it!”