If you’re also a huge fan of braids, I don’t blame you. The endless possibilities to experiment with different braid types and styles, especially braided updos that can be worn for any occasion are just both practical and gorgeous. Most probably, you may have heard about, the milkmaid braid, you know, the one wrapped around your head? Whether it’s a French milkmaid or a Dutch milkmaid braid, it may seem daunting and complicated, but believe me, they’re so easy to do yourself! You can even do a faux version if you don’t have long hair.
In this article, you will find detailed instructions on how to do the milkmaid braid step by step for different hair lengths, along with tips from hairstylists and hair experts. Read on to find out more about this hairstyle, how it came to be the famous braid it is today, and how you can do it on your own hair!
What Is a Milkmaid Braid?
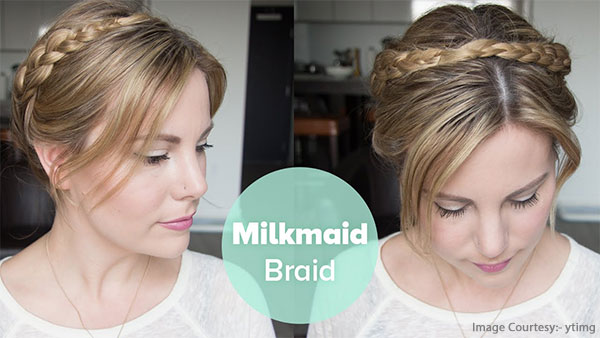
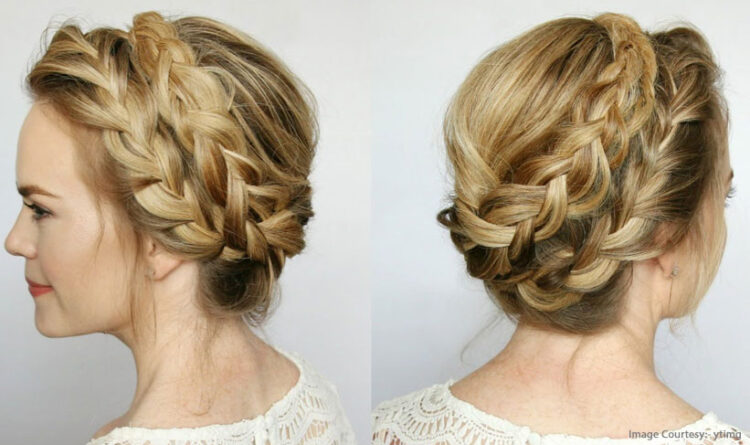
Well, a milkmaid braid is a hairstyle that is basically composed of braids wrapped or encircled around the head similar to a crown braid.
Let’s study some milkmaid braid history. It got its name because of its prevalence among early milkmaids or the ladies who milk cows and prepare dairy products. They used to be worn for practicality rather than style in the olden days. Working women braid their hair as a way to keep it away from the face and allow them to work comfortably even on hot days. Otherwise, their hair is kept in hats or old-fashioned turbans. Different sources point at different countries from which this hairstyle originated, saying it probably came from Sweden, Switzerland, Germany, Austria, or Greece.
Today, however, the hairstyle has gained universal popularity and is now seen on fashionistas, celebrities, and runway models. This is probably due to its appeal of innocence and romance while also being appropriate for casual wear, formal events, festivals on hot summer days, and more! It also leaves so much room for adjustments and various interpretations.
Milkmaid Braid Tutorial Long Hair Version
First, here is the step by step instruction on how to do the milkmaid braid the easiest and simplest way for long hair. If you have mid-length or short hair, just go through this first and later, tricks will be revealed to make it happen with whatever hair length you’ve got!
Step 1. Prepare The Hair For Styling

- Run a brush through your hair to remove tangles and knots. You can start with damp or completely dry hair, even second-day hair!
- Apply an anti-frizz cream, spray, or serum if needed.
Step 2. Part Your Hair

- Most people prefer a center part, but you can always part your hair the way you normally do. Just make sure that both sides have approximately the same amount of hair.
- This is a good time to decide whether you want a clean finish with all the hair swept up in the braids or leave a few strands hanging to frame your face. Short bangs are best left outside of braids.
- Secure each part with an elastic band.
Step 3. Braiding The Hair

- You can start braiding one side of your hair from the center part to the tips, or you can also tie it in pigtails first before braiding.
- Start your braids tight because you can always loosen them up for a more messy, casual look later but there’s no way to tighten a loose braid without messing it up.
- Start braiding your hair by creating the classic three-strand braid. To do this, use your fingers to separate the three strands. Cross the left section of the middle section then cross the right section over the then left but is now the middle section. Every time you cross a side section over, it will become the new middle section. If you’re working from the center part downward, you may have to take new sections of hair from the sides with each crossover.
- You can also use a French braid style or a Dutch braid. A fishtail braid and rope braids work as well.
- Stop braiding about 1-3 inches from the tips and secure this side with an elastic or by crisscrossing two bobby pins. Repeat on the other section of hair.
Step 4. Securing The Braids In a Classic Milkmaid Style

- Once you’re done braiding both sides, take one braid and place it across the front part of the top of your head. Secure the braid with a bobby pin behind some hair or the opposite ear. Do the same with the other side braid, placing it behind the first braid and securing it. You can use as much bobby pins as you need, just make sure that you keep it hidden.
- Tuck in the ends underneath the other braid to keep them out of view. You can also remove the elastics at the bottom and replace them with pins.
Step 5. Finishing Touches!

- You can pull on the sides of your braids to make them look wider and more volumized. You can also use this to hide elastics or pins.
- Loose strands of hair that you left out of the braid can be curled for an excellent look.
- Once you’re satisfied with your braid, keep it in place by using a fair amount of holding
hairspray. This will also prevent flyaways.That’s it! Congratulations, you now have achieved the milkmaid braid look!
Related:- LOOK FRESH EVEN AFTER GYM WITH THESE POST WORKOUT HAIR CARE TIPS
Additional Tips You Need to Know About Braids for Women!
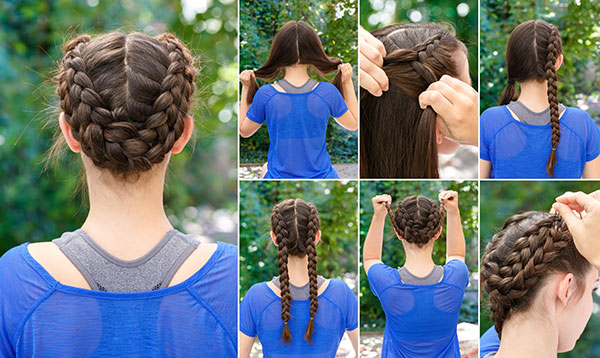
- To do the milkmaid braid short hair version, simply start by making pigtails high up your head and close to your ears. This way, you can still have something to cross over the top of your head.
- Braids work better with thick hair that has not been recently washed. Smooth, conditioned hair is more likely to come loose and hold less.
- To prevent silky hair from falling out of your braid, use dry shampoo or volumizing and texturizing spray first.
- Use elastics that are clear or the same color as your current or natural hair. This will hide them while also strengthening the braid’s hold.
- To hide bobby pins, tuck them in the center of the braids before tugging at the sides and loosening them.
- In doing a milkmaid braids, black hair makes the braid less noticeable. It works and looks better with different hair colors preferably with highlights.
- For a faux milkmaid braid if you have really short hair, put your real hair in a ponytail or bun and use a braided headpiece as a headband.
Now, you know how to do and pull off the classic milkmaid braid with almost no effort at all! It’s great for parties, weddings, and even for everyday hair! Go ahead and have a great hair day!
“Hope you find the post helpful and we are excited to hear what you think of it!”